Location & Mounting
Check Mounting Location Drainage
Make sure the AOP 50 has adequate water drainage (no less than one (1) foot above maximum water level) to protect electrical components.
Check Mounting Location Access
Allow sufficient access for maintenance and all plumbing and electrical hookups. We recommend 2 ft clearance above and 1 ft around the unit.

Check Mounting System Location
The AOP 50 should be installed after the pool heater
Select Mounting Preference
![]()
The DEL AOP 50 unit does not have holes for wall mounting but can be mounted on the wall if desired.
Wall Mounting

Floor Mounting
The DEL AOP 50 is shipped with the Mounting Feet installed in the floor mounting position.
Adjust the position of the feet if necessary and tighten the screws.
Mount the DEL AOP 50 to the equipment pad through the slots provided in the feet using appropriate hardware for the mounting surface.
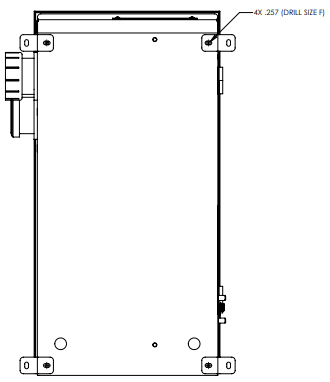
Wall Mounting Preparation
The AOP 50 does not come pre-drilled with holes for wall mounting. You will need to drill 4 holes, (.257 in, drill size F), in the back of the enclosure for hanging.
Open the Door
Use a slotted screwdriver to turn the door latches a half-turn counterclockwise.
Open the door and clean out any debris from drilling the holes.
Mount on the Wall
Remove the pre-installed bottom mounting brackets and install feet in drilled holes with hardware provided.
Mount unit to the wall through the slots in the feet using appropriate hardware for the mounting surface.
Close the Door
Close the door and use a slotted screwdriver to turn the door latches a half-turn clockwise to secure.
![]()
Congratulations!
You have completed this chapter. To go to the next chapter, click next. To go back to the Chapter Table of Contents, click done.