WINTERIZATION
POWER CABLE WARNING
CAUTION: When removing the LED Light Module, make sure to not let the power cable fall back down into the conduit. Use tape or a paper clip around the power cord to prevent the cable from falling prior to disconnecting.
REMOVE EYEBALL & LENS
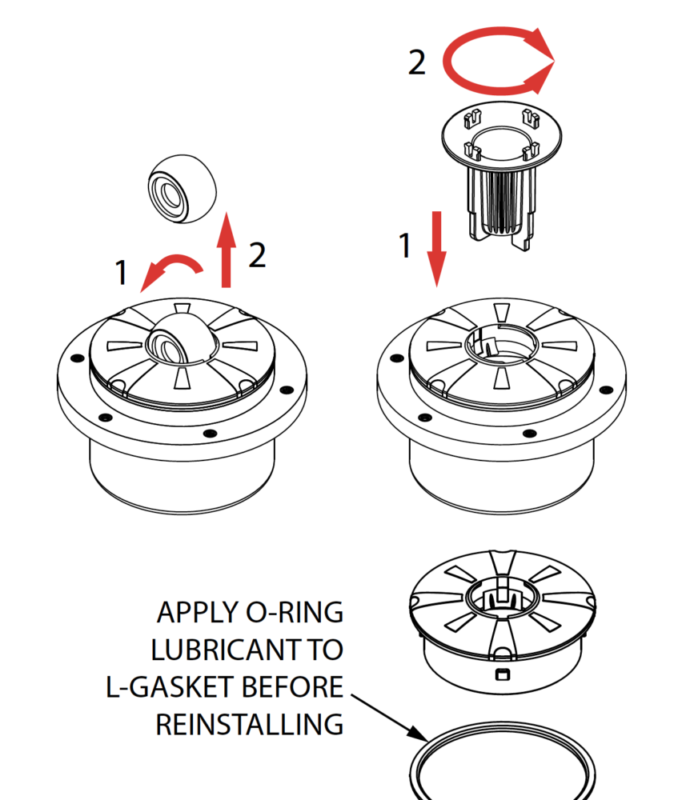
– First, remove the eyeball from the large lens by rotating 90° and lifting out vertically.
– To remove the large lens from the floating collar insert the top of the installation tool into the eyeball cavity (like a key) and rotate it counter-clockwise.
– Replace the eyeball back into the large lens for storage.
HOW TO REMOVE THE LIGHT MODULE

⚠️ Be sure not to damage or misplace the sealing L-Gasket that is underneath the large lens.
– To remove the LED Light Module, insert the four snaps on the Installation Tool into the four snap receptors on the small LED lens.
– Secure the wire inside the main body and use tape to prevent the cord from retracting back into the conduit.
UNSEAL THE LIGHT MODULE
– Using a 3/8″ socket extender inserted into the square hole on the top of the Installation Tool, rotate counterclockwise until you feel a click.
– Keep rotating until the Light Module unseals itself from the conduit.
– Now, pull the Installation Tool upwards and remove the LED Light Module.
CLEAR OUT THE WATER LINE
The last step is to blow the water line free of water using an air compressor.
– After removing the water, install the pressure test cap on the bubbler for the duration of winter.
– Store the large lens with the eyeball, L-gasket, and LED light module in a dry place for winter.
![]()
Congratulations!
You have completed this chapter. To go to the next chapter, click next. To go back to the Chapter Table of Contents, click done.