Pre-Installation Information
INCLUDED PARTS - 8" BUBBLER BOX
Familiarize yourself with all the parts by reviewing the list below:
- Bubbler Unit Lighting Units available in 25, 50, 75, 100, and 150 ft options
- Housing Debris Cover – Winter Cap
- Eyeball Cap
- Eyeball Water Diverter
- Eyeball Reducer Flange
- Light Use Only Cap
- LED Module Retaining Screw – M4
- Vinyl Pool Ring Assembly (OPTIONAL – SOLD SEPARATELY)
- One (1) Vinyl Pool Ring
- One (2) Vinyl Pool Gasket
- Eight (8) Vinyl Pool Flange Screws
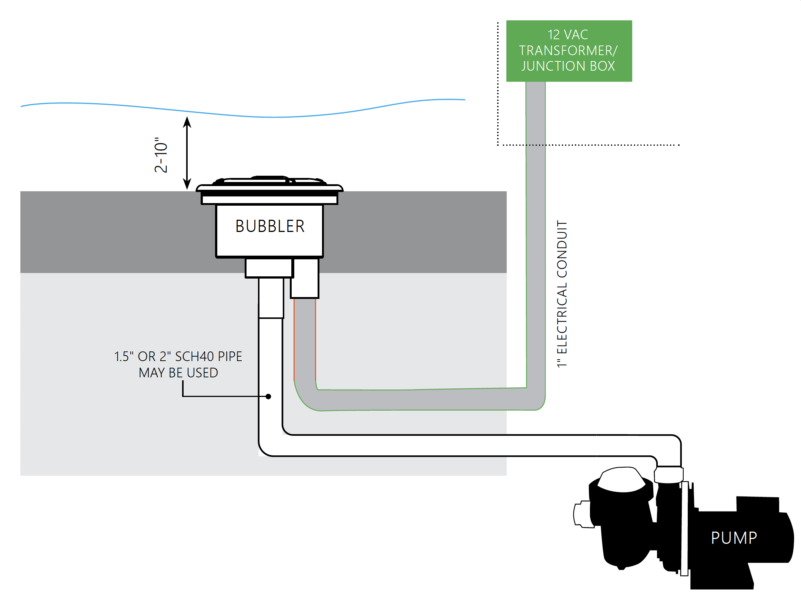
SYSTEM BLOCK DIAGRAM
Before you begin, review the System Block Diagram.
IMPORTANT INFORMATION
RISK OF ELECTRICAL SHOCK OR ELECTROCUTION
All applicable local installation codes and ordinances must be adhered to.
Improper installation will create an electrical hazard that could result in death or serious injury to pool users, installers, or others due to electric shock.
Always disconnect power to the light at the circuit breaker before servicing the light.
BEFORE PROCEEDING
Do not replace wires by splicing wires underwater, or behind the niche.
Only use an approved AC transformer (sold separately). When using a junction box, connect 12V AC connections to the junction box terminals. NEVER connect the light directly to high voltage lines.
NOTE: The external flexible cord cannot be replaced. Do not damage the cord.
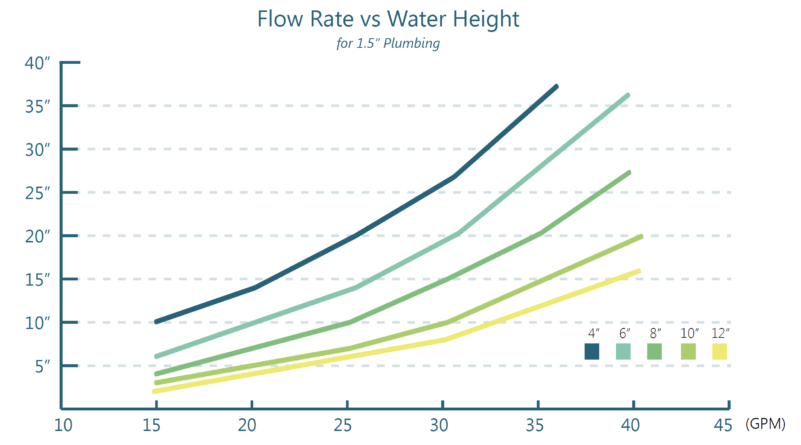
performance chart
Factors such as water flow rate, orifice size and water depth above the orifice will all contribute to the final look of the plume height. The performance chart below can be used as a reference in deciding how to install your bubbler.
NOTE: Results may vary.
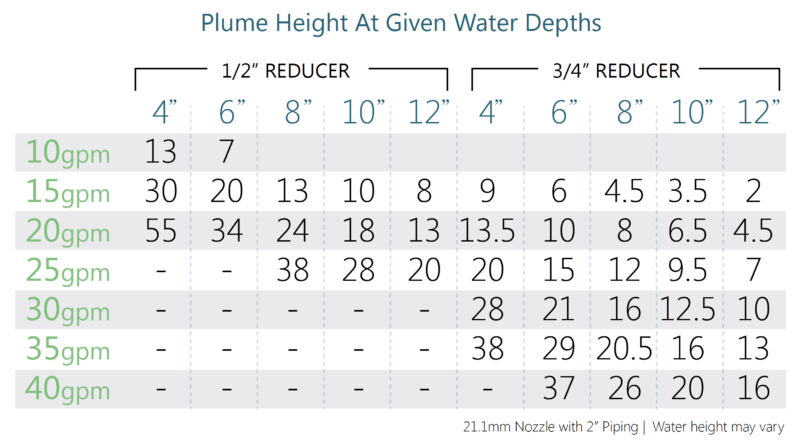
GPM & WATER DEPTH
The table above shows combinations of GPM and depth of the bubbler when mounted in the horizontal position.
![]()
Congratulations!
You have completed this chapter. To go to the next chapter, click next. To go back to the Chapter Table of Contents, click done.