Bobé Fire Pot & Fire Table Installation
Start-up & Operation
Burner Setup
![]()
- Prior to turning appliance on visually inspect fire feature to ensure debris such as leaves or other combustible material has not collected inside the feature which could burn and emit embers once the fire feature is turned on.
- Each burner should have a flame height of approximately 12” – 15” from the top of the pan.
- To adjust flame height, select an option below:
Manual Valve

Burner Setup (Manual Valve)
- The height of the flame can be adjusted at each burner by opening or closing the keyed valve.
- Each burner should be adjusted as required so that the flame size at each bowl is similar in appearance to each other.
- Install decorative rock or glass on top of the “burner support” and burner assembly. Do not completely cover/obstruct the burner.
- Use only approved fire glass or rock media on burners. Unapproved media can melt, crack or even explode
Basic Operation
- Before operating smell all around the appliance area for gas odors and next to the floor. Propane is heavier than air and will settle to the floor.
- Ensure any person standing close to the fire feature is aware you will be turning the fire feature on prior to actually turning it on.
- Use valve key to open gas valve. NEVER attempt to open the valve by hand or using other tools.
- When you hear gas flowing, using either a long stem wooden match or a butane fireplace lighter, place the flame near the burner.
- If the burner does not light, does not stay lit, or the flame is very low, shut off all gas supply and wait five minutes to allow all gas fumes to clear before trying again
- Turn off by closing the manual gas valve
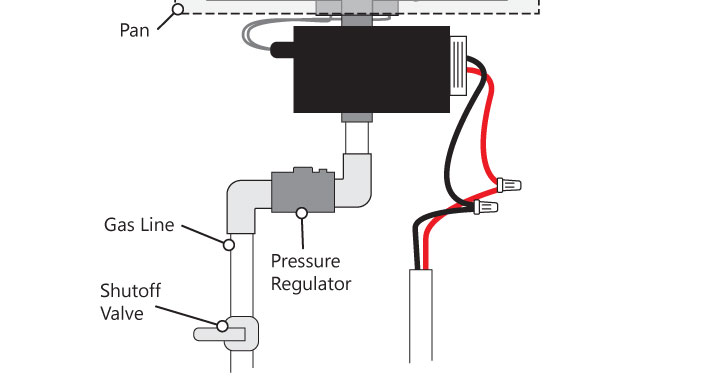
Burner Setup (Auto Ignitor)
- To adjust flame height, remove the silver cap on the regulator and rotate white plastic adjuster up or down. This will adjust the water column up or down
- Each burner should be adjusted as required so that the flame size at each burner is similar in appearance to each other.

Glass/Rock Media
- Use only approved fire glass or rock media on burners. Unapproved media can melt, crack or even explode
- For LP applications, use NO MORE than 1/2” of coverage on top of the burner.
- Media must not cover up the holes on the side of the temp sensor, otherwise the auto ignition will not work properly.
Basic Operation
- Before operating smell all around the appliance area for gas odors and next to the floor. Propane is heavier than air and will settle on the floor.
- Ensure any person standing close to the fire feature is aware you will be turning the fire feature on prior to actually turning it on.
- Turn on the unit at the switch or control panel. The igniter should start glowing followed shortly by the gas valve opening and fire igniting.
- If the unit does not light the first time, there may be air in the gas line. Turn off unit and allow to sit for 30 seconds the power back on. This could potentially take two-three cycles but then should fire consistently.
Regular Care
- Periodically clean the burner assembly with a wet cloth or cleaning solution to remove carbon build-up. Frequency of the cleaning will depend on usage.
- Periodically inspect the underside of the burner assembly for any signs of excessive temperatures.
- Keep the ignition and temperature probe locations clear of media or debris.
- The burner assembly should be covered and protected from snow and ice. The burner should not be operated in high wind conditions.
- Use the system! If the feature has been inactive for an extended period, turn fire feature on to ensure proper operation.
Maintenance
- Check that all gas connections are tight.
- Visually inspect burner holes for debris/insect infestation Clean burners as necessary using compressed air.
- Inspect the gas line regularly. If the line shows evidence of excessive abrasion or wear or if the line is damaged, it must be replaced before use.
- Inspect the burner before each use of the appliance. If there is any evidence that the burner is damaged, it must replaced before operating.
![]()
Congratulations!
You have completed this chapter. To go to the next chapter, click next. To go back to the Chapter Table of Contents, click done.