Ignition System Installation
Select ignition system type
![]()
Bobé offers two systems for fire ignition
Manual Valve: A keyed valve that is opened by hand and lit with a match
Automatic Ignitor: An electrical ignitor that can be controlled with a switch
Which system are you installing?
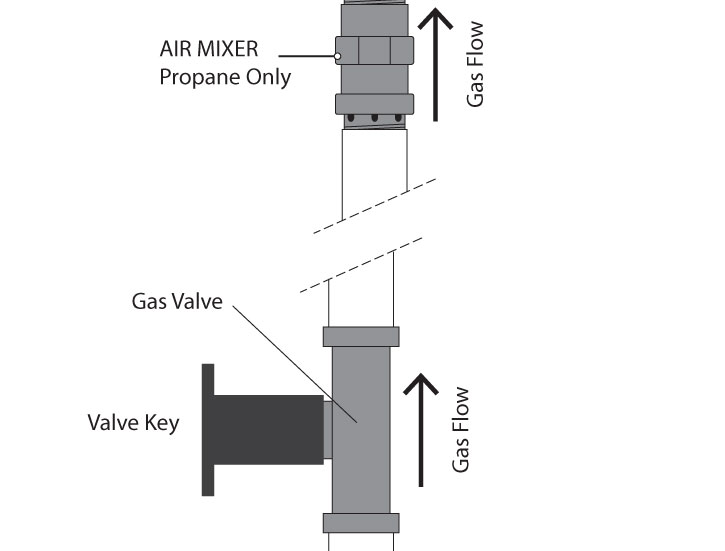
Manual Valve
Check for Parts Included/Required
- Gas valve
- Valve Key Access Trim piece with Key
- 3/4” to 1/2” Reducer
- 1/2” x 12” pipe
- 1/2” nipple
- 1/2” coupling
- 1/2” air mixer (Propane Kit Only)
- 1/2” 90° elbow
- Also Required: pipe dope/sealant (not included)
What type of gas are you using?
![]()
Bobé systems can operate with natural gas or liquid propane. Each has different pressure requirements, and liquid propane has special components to ensure the correct mix of oxygen and product safety.
Liquid Propane
Special Liquid Propane Requirements
There are two important factors to consider with “LP” gas. Propane is heavier than air and will sink, so lower ventilation is extremely important. Propane requires more oxygen to burn cleanly so proper flow and use of the air mixer is a requirement.
- Air mixers required for Liquid Propane.
- No elbows immediately after an air mixer. Do not attach the air mixer directly to the fire ring.
- All propane units must utilize a pan beneath the fire ring to help prevent gas from sinking and building up.
- Our units are NOT intended to be used with small portable LP tanks.
- For the air mixer, be sure to follow specific instructions and make sure the gas is flowing in the same direction as the arrow on the air mixer. Failure to do so could result in personal injury and damage to unit/property.
- Vent collars for an air mixer intake on a propane system should not be obstructed.
Valve Installation
Before beginning, ensure the gas line is turned OFF.
Install 3/4” to 1/2” reducer to the bottom of the burner on the underside of the pan
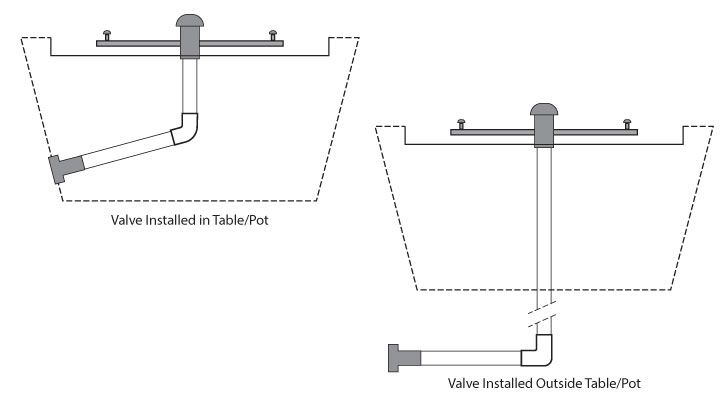
Install the gas valve with Valve Key Access in an accessible location
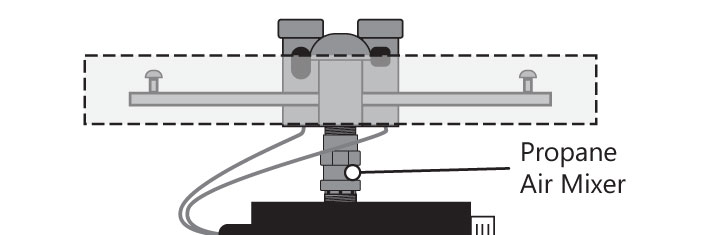
NOTE: The air mixer must be installed to use liquid propane. The “holes” on the air mixer should always face DOWN, away from the burner and pan. Installing in the wrong direction can lead to a fire under the pan and serious danger or harm.
Run 1/2” gas line to one side of the gas valve. The use of a corrugated gas line can cause unwanted noise and is not recommended.

Valve Installation
Before beginning, ensure the gas line is turned OFF.
Install 3/4” to 1/2” reducer to the bottom of the burner on the underside of the pan
Install the gas valve with Valve Key Access in an accessible location
Run 1/2” gas line to one side of the gas valve. The use of a corrugated gas line can cause unwanted noise and is not recommended.
FEED GAS CONNECTION
- Connect the gas feed line to the other side of the valve
- Replace the burner/pan assembly and turn gas to the system back ON
- Use pipe dope/joint compound on ALL threaded fittings EXCEPT flared fittings.
- DO NOT daisy chain the gas line.
Review all connections
Verify all gas connections are tightened securely. ALWAYS perform leak tests and make repairs as needed.
Upon completing the gas line connection, a small amount of air will be in the lines. When first lighting the burner, it will take a few minutes for the lines to purge themselves of this air. Subsequent lighting of the appliance will not require such purging.
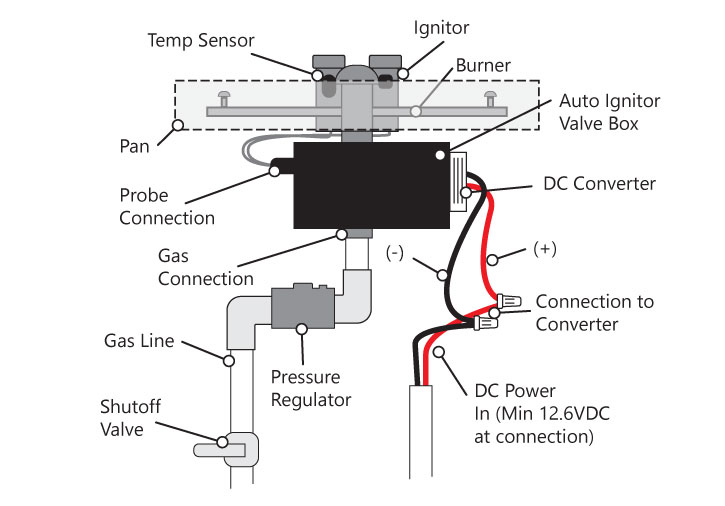
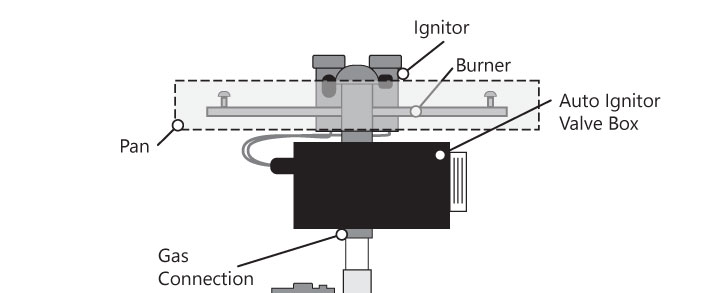
Auto Ignitor Overview
Auto Ignition Black Box: all gas and electrical connections are on the box.
Transformer: A 12.6 Volt DC transformer is pre-installed.
Probes: two probes connect to the side of the box with a quick connector. There are two probes: one for thermocouple temp sensor and one igniter.
Other Items
Air mixer: included with Liquid Propane units
Pressure regulator
Shut-off valve: not included
What type of gas are you using?
![]()
Bobé systems can operate with natural gas or liquid propane. Each has different pressure requirements, and liquid propane has special components to ensure the correct mix of oxygen and product safety.
Liquid Propane
Special Liquid Propane Requirements
There are two important factors to consider with “LP” gas. Propane is heavier than air and will sink, so lower ventilation is extremely important. Propane requires more oxygen to burn cleanly so proper flow and use of the air mixer is a requirement.
- Air mixers required for Liquid Propane.
- No elbows immediately after an air mixer. Do not attach the air mixer directly to the fire ring.
- All propane units must utilize a pan beneath the fire ring to help prevent gas from sinking and building up.
- Our units are NOT intended to be used with small portable LP tanks.
- For the air mixer, be sure to follow specific instructions and make sure the gas is flowing in the same direction as the arrow on the air mixer. Failure to do so could result in personal injury and damage to unit/property.
- Vent collars for an air mixer intake on a propane system should not be obstructed.
Auto Valve Connection (Propane)
Before beginning, ensure the gas line is turned OFF.
- NOTE: The air mixer must be installed to use liquid propane. The “holes” on the air mixer should always face DOWN, away from the burner and pan. The air mixer should be installed immediately below the burner.
- Run 1/2” gas line to the bottom connection on the black box
- Use pipe dope/joint compound on ALL threaded fittings EXCEPT flared fittings.
- Keep pipe length and elbows to a minimum to eliminate unnecessary pressure drops.
- The use of a corrugated gas line can cause unwanted noise.
Auto Valve Connection
Before beginning, ensure the gas line is turned OFF.
- Run 1/2” gas line to the bottom connection on the black box
- Use pipe dope/joint compound on ALL threaded fittings EXCEPT flared fittings.
- Keep pipe length and elbows to a minimum to eliminate unnecessary pressure drops.
- The use of a corrugated gas line can cause unwanted noise.
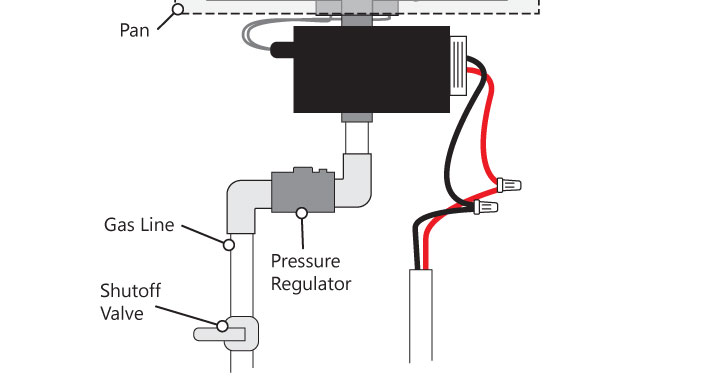
Pressure Regulator
Connect the pressure regulator in line before the Auto Ignitor Box. The regulator should be installed horizontally. The directional arrow should point away from the gas source and towards the gas valve.
Confirm no more than 1/2 PSI on at the regulator inlet. If the pressure is too high regulator will shut off the gas flow. If above 1/2 PSI you can install a second regulator to reduce the pressure to 1/2 PSI before the included regulator.
Review Connections
- Verify all gas connections are tightened securely. ALWAYS perform leak tests and make repairs as needed.
- DO NOT daisy chain the gas lines.
- A shut-off valve must be installed at each fire feature or valve. The primary gas valve must be located where they can be easily accessible so that the gas can be shut off quickly in case of an emergency.
Electrical: Power Requirements
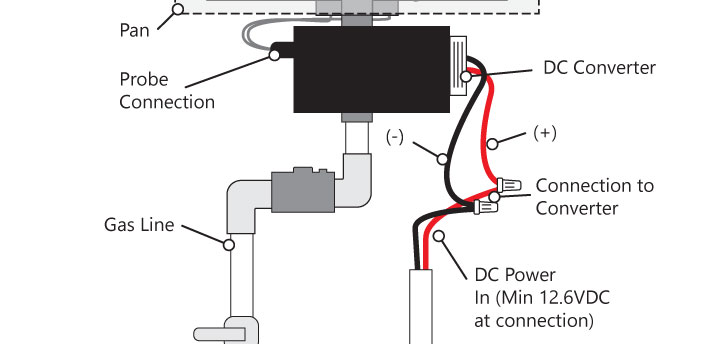
- Recommended minimum wire gauge: 10 AWG
- Voltage requirements: minimum 12.6 volts DC, up to 36 Volts DC at the DC Converter
- The included converter steps down to 12.6 V DC
- The installer should check the voltage after installation to ensure proper values
Electrical Connections
- There are two wire connections on the side of the black box at the DC Converter. Connect to power source using wire nuts.
- These are DC power connections. You must match polarity when connecting. Connect red wire to red wire and black wire to black or blue wire.
- Wrap wire nuts with electrical tape or some means to prevent moisture from getting in. Make sure wire nuts are positioned away from the bottom of the burner assembly.
- Connect ground from incoming power to ground lug (If required by local codes)
Important: Do not “daisy chain” electrical lines
Check System
- Before operating smell all around the appliance area for gas odors and next to the floor (LP is heavier than air and will settle on the floor.
- Ensure any person standing close to the fire feature is aware you will be turning the fire feature on prior to actually turning it on.
- Do not add glass or rock media to the pan until a system test is complete.
Test System
- Turn on the unit at the switch or control panel. The igniter should start glowing followed shortly by the gas valve opening and fire igniting.
- Allow the unit to run for approximately five minutes then turn off.
- Allow to cool down for approximately three minutes before trying to re-start. As a safety feature, the thermocouple will not allow the unit to re-fire until it has cooled down.
![]()
Congratulations!
You have completed this chapter. To go to the next chapter, click next. To go back to the Chapter Table of Contents, click done.