WATER OPERATION
INITIAL STARTUP CHECKLIST
The following checklist should be reviewed prior to startup. This includes initial construction startup and seasonal startup.
- Remove the construction/debris cover from the Bubbler.
- Now, visually inspect the unit to ensure that there is no debris in the nozzle.
- Inspect the housing and LED module for any signs of damage such as cracks, holes, etc.
- Then, check to ensure that the LED module has been locked into place. If not, secure the light by pushing the light downward onto the hub and twisting the light unit COUNTER-CLOCKWISE. Now, secure the unit by replacing the LED Module Retaining Screw.
- Ensure all electrical connections have been verified and inspected.
- Do not turn on the unit until the pool has been filled to the full watermark.
NOTE: Only use water that is properly filtered.
PURGE THE LINES OF AIR
After performing the startup checklist, turn on the pumping system and allow the air to purge from the lines.
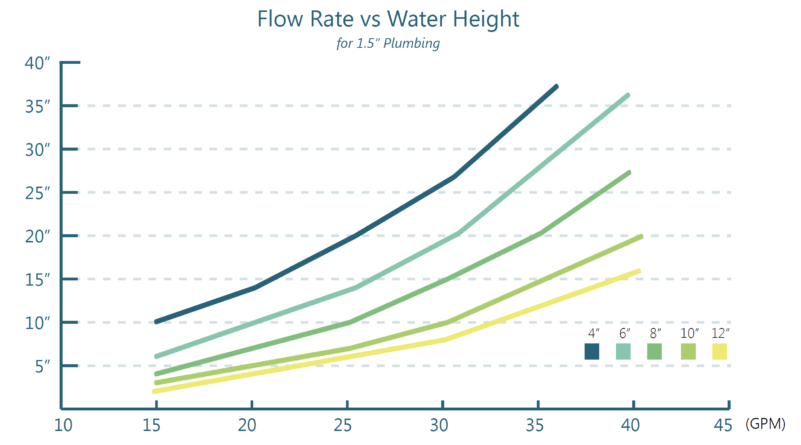
Using the inline flow control valve, adjust the flow to the bubbler to obtain the desired height of the water flume.
Refer to the data in the table for general performance data.
VISUALLY CHECK UNIT
Before going further, visually check the unit to ensure that there are no leaks in the housing or the lighting unit.
If any leaks are found, turn off the water and address the leakage.
If the leakage is internal to the unit, please call customer service for further support.
REPEAT & RE-CHECK
Repeat the start-up sequence and re-check the unit.
TURN BUBBLER ON
After the unit is running properly, flip the power on to the transformer at the control box.
Then, turn on the bubbler using the wall switch. All lights should be functional.
NOTE: Do not look directly into the LED light source. Permanent eye damage may occur.
If the unit is not fully submerged in water, do not operate the LED lights for more than twenty (20) seconds. Failure to do so may cause overheating and damage the electronics.
![]()
Congratulations!
You have completed this chapter. To go to the next chapter, click next. To go back to the Chapter Table of Contents, click done.