pre-installation information
INCLUDED PARTS - 4" LED BUBBLER BOX
Body & Hardware
- (1) Main Body Assembly
- (1) Pressure Test Hardware
- (6) M4 Machine Screws
- (6) M4 Hex Nuts
- (1) Stopper Assembly
- (1) Pressure Test Cap
- (1) Pressure O-Ring
Gunite Only Items & Lens
- (1) Floating Collar (Gunite Only)
- (1) Large Lens
- (1) L-Gasket
- (1) Eyeball
- (1 set) Orifice Discs
- (1) Lubricant
INCLUDED PARTS - LED LIGHT BOX
- (1) Led Light Module
- (1) Installation Tool
- (1) Electric Cable
REQUIRED TOOLS
- 7 mm Wrench
- 3/8″ Socket Wrench
- 3/8″ Socket Extender
- PVC Glue
- Level
- Phillips Head Screw Driver
- O-Ring Lubricant
IMPORTANT INFORMATION
All applicable local installation codes and ordinances must be adhered to.
Improper installation will create an electrical hazard that could result in death or serious injury to pool users, installers, or others due to electric shock.
No separate ground or bonding wire is required for the Brilliant Wonders 4” LED Bubbler light module which has no exposed metal and does not require a niche.
BEFORE PROCEEDING
Always disconnect power to the pool lights before installing or servicing.
The 4” LED Bubbler light module is a low voltage light and should never be electrically connected to a power source other than an approved pool “Safety Rated,” UL listed, outdoor rated, 12 VAC transformer.
Failure to comply will either damage or destroy the light module and will void the warranty.
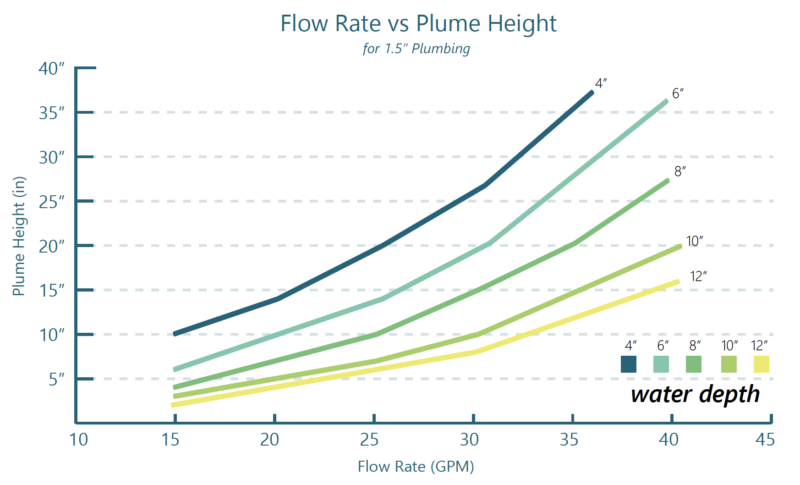
PERFORMANCE CHART
Factors such as water flow rate, orifice size and water depth above the orifice will all contribute to the final look of the plume height. The performance chart below can be used as a reference in deciding how to install your 4″ Bubbler.
NOTE: Results may vary.
![]()
Congratulations!
You have completed this chapter. To go to the next chapter, click next. To go back to the Chapter Table of Contents, click done.